1.多线程安全的单例模式 1 2 3 4 5 6 7 8 9 10 11 12 13 14 15 16 17 18 19 20 21 22 23 24 25 26 27 class Bank private Bank () } private static Bank instance = null ; public static synchronized Bank getInstance () if (instance == null ){ instance = new Bank(); } return instance; } }
2.线程的死锁问题 不同的线程分别占用对方需要的同步资源 不放弃,都在等待对方放弃 自己需要的同步资源,就形成了线程的死锁
出现死锁后,不会出现异常,不会出现提示,只是所有的线程都处于 阻塞状态,无法继续
1 2 3 4 5 6 7 8 9 10 11 12 13 14 15 16 17 18 19 20 21 22 23 24 25 26 27 28 29 30 31 32 33 34 35 36 37 38 39 40 41 42 43 44 45 46 47 48 49 50 51 52 53 54 class ThreadTest public static void main (String[] args) StringBuffer s1 = new StringBuffer(); StringBuffer s2 = new StringBuffer(); new Thread(){ @Override public void run () synchronized (s1){ s1.append("a" ); s2.append("1" ); synchronized (s2){ s1.append("b" ); s2.append("2" ); System.out.println(s1); System.out.println(s2); } } } }.start(); new Thread(new Runnable() { @Override public void run () synchronized (s2){ s1.append("c" ); s2.append("3" ); synchronized (s1){ s1.append("d" ); s2.append("4" ); System.out.println(s1); System.out.println(s2); } } } }).start(); } }
加个sleep,让死锁的概率高一点
第一个线程等待拿s2,第二个线程等待拿s1,出现死锁
我们使用同步时要避免死锁
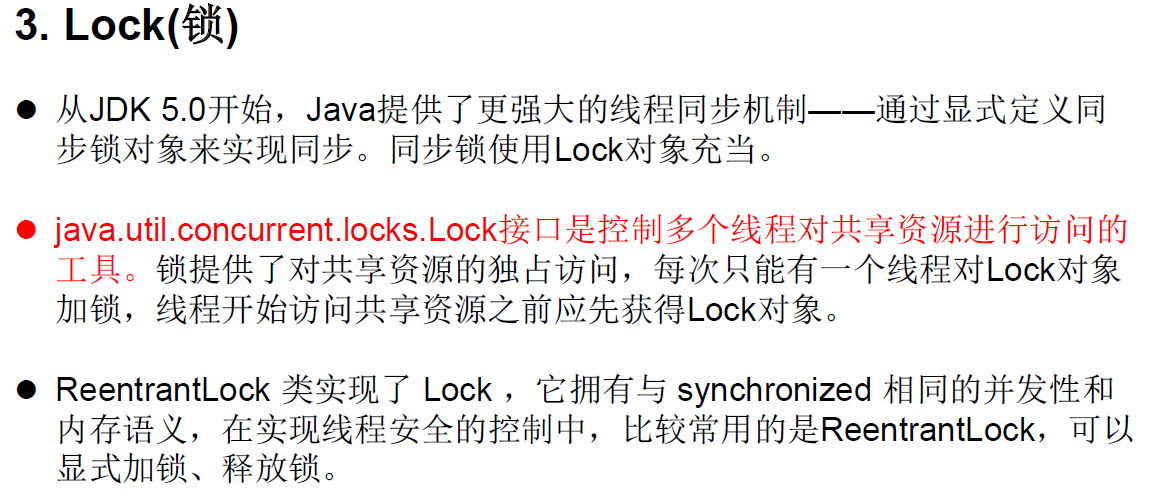
3.方式三:Lock锁 — JDK5.0新增
1
2
3
4
5
6
7
8
9
10
11
12
13
14
15
16
17
18
19
20
21
22
23
24
25
26
27
28
29
30
31
32
33
34
35
36
37
38
39
40
41
42
43
class HThread implements Runnable private int ticket = 100 ; private ReentrantLock lock = new ReentrantLock(); @Override public void run () while (true ) { try { lock.lock(); if (ticket > 0 ) { try { Thread.sleep(100 ); } catch (InterruptedException e) { e.printStackTrace(); } System.out.println(Thread.currentThread().getName() + ":" + ticket); ticket--; }else { break ; } }finally { lock.unlock(); } } } } class Thread_2 public static void main (String[] args) HThread mTherad = new HThread(); Thread th1 = new Thread(mTherad); Thread th2 = new Thread(mTherad); th1.setName("窗口1" ); th2.setName("窗口2" ); th1.start(); th2.start(); } }
synchronized 与 Lock的异同?
相同:二者都可以解决线程安全问题
不同:synchronized机制在执行完相应的同步代码以后,自动的释放同步监视器
Lock需要手动的启动同步(lock(),同时结束同步也需要手动的实现(unlock())
建议使用顺序:
Lock —> 同步代码块(已经进入了方法体,分配了相应资源 ) —> 同步方法(在方法体之外)
4.线程的通信 线程通信涉及到的三个方法
说明同步监视器 。否则,会出现IllegalMonitorStateException异常。
使用两个线程打印 1-100 。线程 1, 线程 2 交替打印。
1
2
3
4
5
6
7
8
9
10
11
12
13
14
15
16
17
18
19
20
21
22
23
24
25
26
27
28
29
30
31
32
33
34
35
36
37
38
39
40
41
42
43
class Number implements Runnable private int number = 1 ; @Override public void run () while (true ) { synchronized (this ) { notify(); if (number <= 100 ) { try { Thread.sleep(100 ); } catch (InterruptedException e) { e.printStackTrace(); } System.out.println(Thread.currentThread().getName() + ":" + number); number++; try { wait(); } catch (InterruptedException e) { e.printStackTrace(); } } else { break ; } } } } } public class CommunicationTest public static void main (String[] args) Number num = new Number(); Thread th1 = new Thread(num); Thread th2 = new Thread(num); th1.setName("线程1" ); th2.setName("线程2" ); th1.start(); th2.start(); } }
面试题
sleep() 和 wait()的异同?
相同点:一旦执行方法,都可以使得当前的线程进入阻塞状态。
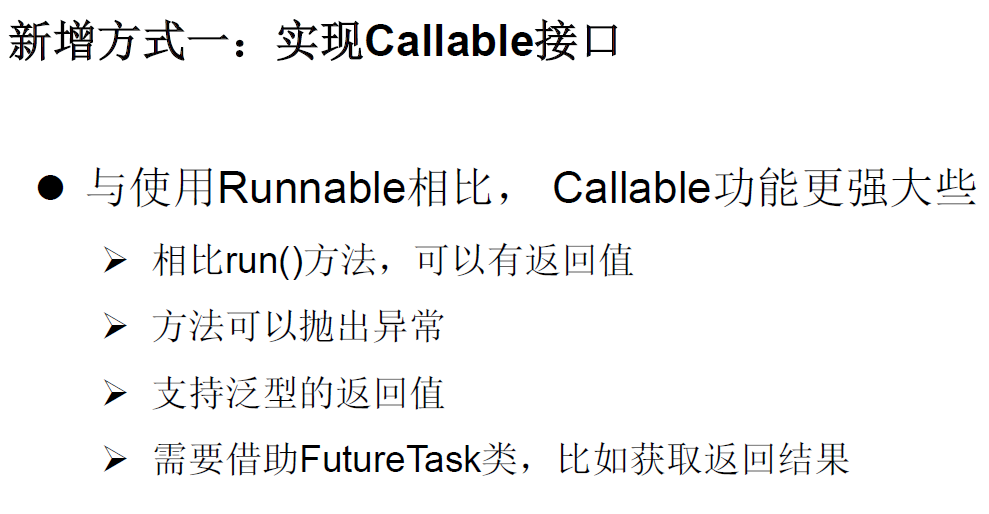
5.实现Callable 接口创建多线程(了解)
1 2 3 4 5 6 7 8 9 10 11 12 13 14 15 16 17 18 19 20 21 22 23 24 25 26 27 28 29 30 31 32 33 34 35 36 37 38 39 40 41 42 class NumThread implements Callable @Override public Object call () throws Exception int sum = 0 ; for (int i = 1 ; i <= 100 ; i++) { if (i % 2 == 0 ){ System.out.println(i); sum += i; } } return sum; } } public class ThreadNew public static void main (String[] args) NumThread numThread = new NumThread(); FutureTask futureTask = new FutureTask(numThread); new Thread(futureTask).start(); try { Object sum = futureTask.get(); System.out.println("总和为:" + sum); } catch (InterruptedException e) { e.printStackTrace(); } catch (ExecutionException e) { e.printStackTrace(); } } }
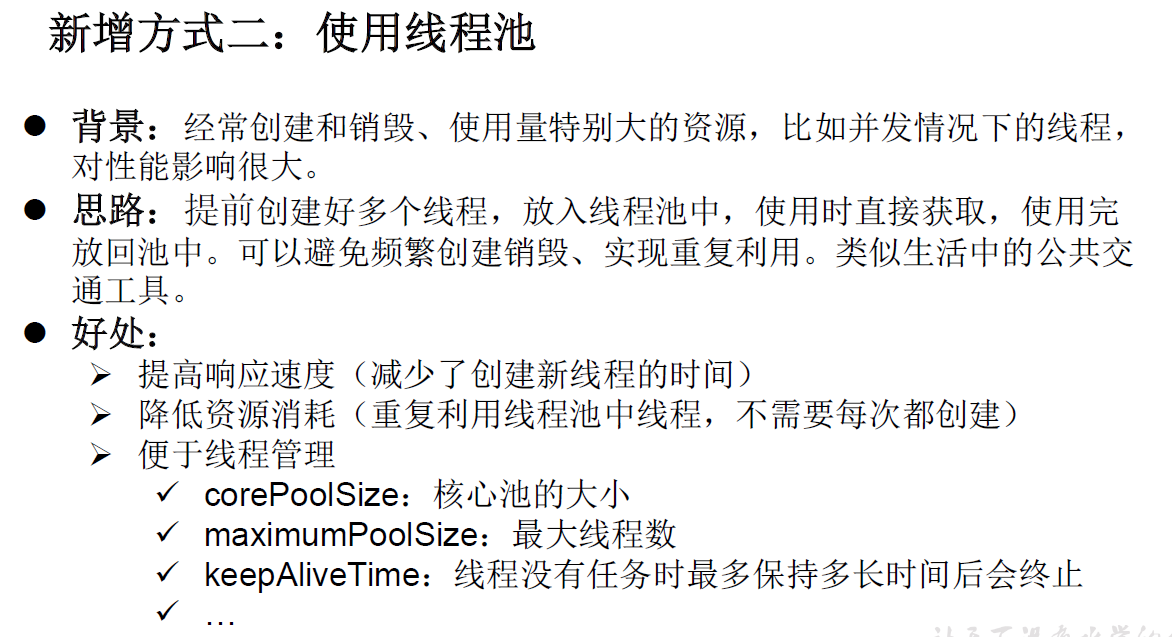
6.使用线程池创建多线程
1
2
3
4
5
6
7
8
9
10
11
12
13
14
15
16
17
18
19
20
class NumberThread implements Runnable @Override public void run () for (int i = 0 ; i < 100 ; i++) { if (i % 2 == 0 ){ System.out.println(i); } } } } public class ThreadPool public static void main (String[] args) ExecutorService service = Executors.newFixedThreadPool(10 ); service.execute(new NumberThread()); service.shutdown(); } }