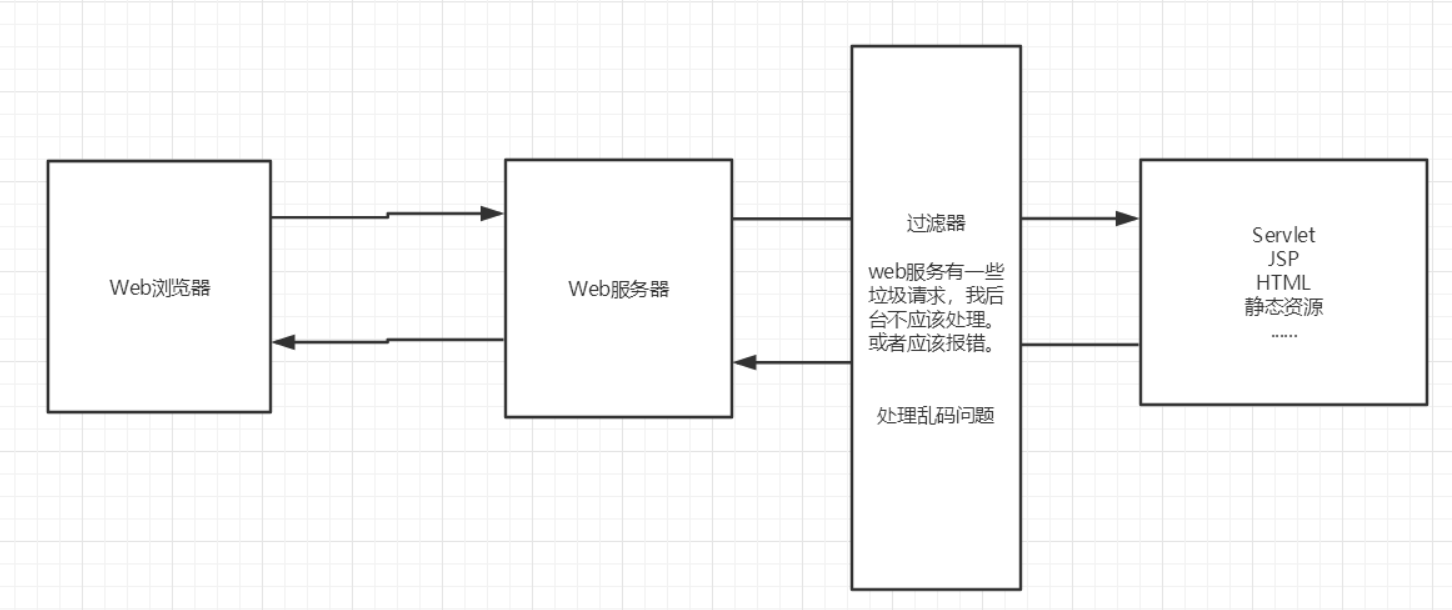
1.Filter
Filter是过滤器,就是对客户端发出来的请求进行过滤。浏览器发出请求,然后服务器派servlet处理。在中间就可以过滤,其实过滤器起到的是拦截的作用。使用过滤器可以对一些敏感词汇进行过滤、统一设置编码、实现自动登录等功能。
参考博客: https://www.liaoxuefeng.com/wiki/1252599548343744/1266264823560128。
新建Maven空项目。
Filter开发步骤:
- 导包
- 编写过滤器,和servlet类似
这里导mysql,servlet,jsp,jstl和standard五个包。
1
2
3
4
5
| <dependency>
<groupId>mysql</groupId>
<artifactId>mysql-connector-java</artifactId>
<version>5.1.47</version>
</dependency>
|
在java目录下新建两个包(servlets和filters):
创建CharacterEncodingFilter.java和ShowServlet.java。
1
2
3
4
5
6
7
8
9
10
11
12
13
14
15
16
17
18
19
20
21
22
23
24
25
26
27
28
29
30
| public class CharacterEncodingFilter implements Filter {
@Override
public void init(FilterConfig filterConfig) throws ServletException {
System.out.println("CharacterEncodingFilter初始化!");
}
@Override
public void doFilter(ServletRequest servletRequest, ServletResponse servletResponse, FilterChain filterChain) throws IOException, ServletException {
servletRequest.setCharacterEncoding("utf-8");
servletResponse.setCharacterEncoding("utf-8");
servletResponse.setContentType("text/html;charset=utf-8");
System.out.println("CharacterEncodingFilter执行前!");
filterChain.doFilter(servletRequest,servletResponse);
System.out.println("CharacterEncodingFilter执行后!");
}
@Override
public void destroy() {
System.out.println("CharacterEncodingFilter销毁!");
}
}
|
1
2
3
4
5
6
7
8
9
10
11
12
| public class ShowServlet extends HttpServlet {
@Override
protected void doGet(HttpServletRequest req, HttpServletResponse resp) throws ServletException, IOException {
resp.getWriter().write("你好,世界!");
}
@Override
protected void doPost(HttpServletRequest req, HttpServletResponse resp) throws ServletException, IOException {
doGet(req,resp);
}
}
|
在web.xml中配置 Filter:
1
2
3
4
5
6
7
8
9
10
11
12
13
14
15
16
17
18
| <servlet>
<servlet-name>showservlet</servlet-name>
<servlet-class>top.grantdrew.servlets.ShowServlet</servlet-class>
</servlet>
<servlet-mapping>
<servlet-name>showservlet</servlet-name>
<url-pattern>/servlet/show</url-pattern>
</servlet-mapping>
<filter>
<filter-name>CharacterEncoding</filter-name>
<filter-class>top.grantdrew.filters.CharacterEncodingFilter</filter-class>
</filter>
<filter-mapping>
<filter-name>CharacterEncoding</filter-name>
<url-pattern>/servlet/*</url-pattern>
</filter-mapping>
|
Filter执行顺序:
- 客户端发出请求,先经过过滤器,如果过滤器放行,那么才能到servlet。
- 如果有多个过滤器,那么他们会按照注册的映射顺序来排队。只要有一个过滤器不放行,那么后面排队的过滤器以及咱们的servlet都不会收到请求。如果全部放行了,那么回来的时候将会是反向执行。
过滤器常见应用:
用户登录之后才能进入主页!用户注销后就不能进入主页了!
- 用户登录之后,向Sesison中放入用户的数据
- 进入主页的时候要判断用户是否已经登录;要求:在过滤器中实现!
首先创建login.jsp,用户登录页面。
1
2
3
4
5
6
7
8
9
10
11
12
13
14
15
16
17
18
19
| <%@ page contentType="text/html;charset=UTF-8" language="java" %>
<html>
<head>
<title>登录页面</title>
</head>
<body>
<form action="${pageContext.request.contextPath}/servlet/login" method="post">
<p>
用户名:<input type="text" name="username" />
</p>
<p>
密码:<input type="password" name="pwd" />
</p>
<p>
<input type="submit" value="提交">
</p>
</form>
</body>
</html>
|
表单提交到/servlet/login由LoginServlet.java来处理登录请求。
1
2
3
4
5
6
7
8
9
10
11
12
13
14
15
16
17
18
| public class LoginServlet extends HttpServlet {
@Override
protected void doGet(HttpServletRequest req, HttpServletResponse resp) throws ServletException, IOException {
doPost(req, resp);
}
@Override
protected void doPost(HttpServletRequest req, HttpServletResponse resp) throws ServletException, IOException {
String username = req.getParameter("username");
if ("admin".equals(username)){
req.getSession().setAttribute(Constant.USER_SESSION,req.getSession().getId());
resp.sendRedirect("/Filter_01_war_exploded/sys/success.jsp");
}else{
resp.sendRedirect("/Filter_01_war_exploded/error.jsp");
}
}
}
|
1
2
3
4
|
public class Constant {
public final static String USER_SESSION = "LOGIN_SESSION";
}
|
登录成功页面,sys/success.jsp:登录用户的相关页面都放在sys目录下由过滤器过滤。
1
2
3
4
5
6
7
8
9
10
| <%@ page contentType="text/html;charset=UTF-8" language="java" %>
<html>
<head>
<title>个人主页</title>
</head>
<body>
<h1>登录成功!!!</h1>
<p><a href="${pageContext.request.contextPath}/servlet/logout">点击注销登录</a></p>
</body>
</html>
|
sys路径下的过滤器:
1
2
3
4
5
6
7
8
9
10
11
12
13
14
15
16
17
18
19
20
21
22
23
| public class SysFilter implements Filter {
@Override
public void init(FilterConfig filterConfig) throws ServletException {
}
@Override
public void doFilter(ServletRequest req, ServletResponse resp, FilterChain chain) throws IOException, ServletException {
HttpServletRequest request = (HttpServletRequest) req;
HttpServletResponse response = (HttpServletResponse) resp;
if (request.getSession().getAttribute(Constant.USER_SESSION) == null){
response.sendRedirect("/Filter_01_war_exploded/login.jsp");
}
chain.doFilter(req,resp);
}
@Override
public void destroy() {
}
}
|
注销处理程序LogoutServlet:
1
2
3
4
5
6
7
8
9
10
11
12
13
14
15
16
17
18
19
20
21
22
23
| package top.grantdrew.filters;
import javax.servlet.ServletException;
import javax.servlet.http.HttpServlet;
import javax.servlet.http.HttpServletRequest;
import javax.servlet.http.HttpServletResponse;
import java.io.IOException;
public class LogoutServlet extends HttpServlet {
@Override
protected void doGet(HttpServletRequest req, HttpServletResponse resp) throws ServletException, IOException {
Object obj = req.getSession().getAttribute("LOGIN_SESSION");
if (obj != null){
req.getSession().removeAttribute(Constant.USER_SESSION);
}
resp.sendRedirect("/Filter_01_war_exploded/login.jsp");
}
@Override
protected void doPost(HttpServletRequest req, HttpServletResponse resp) throws ServletException, IOException {
doGet(req, resp);
}
}
|
登录错误页面error.jsp:
1
2
3
4
5
6
7
8
9
10
| <%@ page contentType="text/html;charset=UTF-8" language="java" %>
<html>
<head>
<title>错误主页</title>
</head>
<body>
<h1>登录失败!</h1>
<a href="login.jsp">返回登录页面</a>
</body>
</html>
|
路径配置文件web.xml:
1
2
3
4
5
6
7
8
9
10
11
12
13
14
15
16
17
18
19
20
21
22
23
24
25
26
27
| <filter>
<filter-name>sysfilter</filter-name>
<filter-class>top.grantdrew.filters.SysFilter</filter-class>
</filter>
<filter-mapping>
<filter-name>sysfilter</filter-name>
<url-pattern>/sys/*</url-pattern>
</filter-mapping>
<servlet>
<servlet-name>login</servlet-name>
<servlet-class>top.grantdrew.filters.LoginServlet</servlet-class>
</servlet>
<servlet-mapping>
<servlet-name>login</servlet-name>
<url-pattern>/servlet/login</url-pattern>
</servlet-mapping>
<servlet>
<servlet-name>logout</servlet-name>
<servlet-class>top.grantdrew.filters.LogoutServlet</servlet-class>
</servlet>
<servlet-mapping>
<servlet-name>logout</servlet-name>
<url-pattern>/servlet/logout</url-pattern>
</servlet-mapping>
|
2.Listener
Listener是监听器,监听Servlet某一个事件的发生或者状态的改变,它的内部其实就是接口回调。
Listener顾名思义就是监听器,有好几种Listener,其中最常用的是ServletContextListener。
监听器在GUI中经常用到,在Java Web中应用较少。
可以实现的监听器接口有非常多种,这里只举一个例子。
在java目录下新建包listens:
创建OnlineCountListener.java:
1
2
3
4
5
6
7
8
9
10
11
12
13
14
15
16
17
18
19
20
21
22
23
24
25
26
27
28
29
|
public class OnlineCountListener implements HttpSessionListener {
@Override
public void sessionCreated(HttpSessionEvent se) {
ServletContext servletContext = se.getSession().getServletContext();
Integer onlineCount = (Integer) servletContext.getAttribute("OnlineCount");
if (onlineCount == null){
onlineCount = 1;
}else{
onlineCount ++;
}
servletContext.setAttribute("OnlineCount",onlineCount);
}
@Override
public void sessionDestroyed(HttpSessionEvent se) {
ServletContext servletContext = se.getSession().getServletContext();
Integer onlineCount = (Integer) servletContext.getAttribute("OnlineCount");
if (onlineCount == null){
onlineCount = 0;
}else{
onlineCount --;
}
servletContext.setAttribute("OnlineCount",onlineCount);
}
}
|
编写index.jsp:
1
2
3
4
5
6
7
8
9
| <%@ page contentType="text/html;charset=UTF-8" language="java" %>
<html>
<head>
<title>Title</title>
</head>
<body>
<p> 当前有 <span><%=application.getAttribute("OnlineCount") %> </span> 人在线!</p>
</body>
</html>
|
在web.xml中注册监听器:
1
2
3
4
|
<listener>
<listener-class>top.grantdrew.listeners.OnlineCountListener</listener-class>
</listener>
|
测试一下:
如果出现在线人数不是1个人,重新部署一下Tomcat就行了。(也可能是有多个浏览器)
3.JDBC复习
参考MySQL学习笔记(九)。
4.Java Web项目(JDBC)
参考项目笔记。
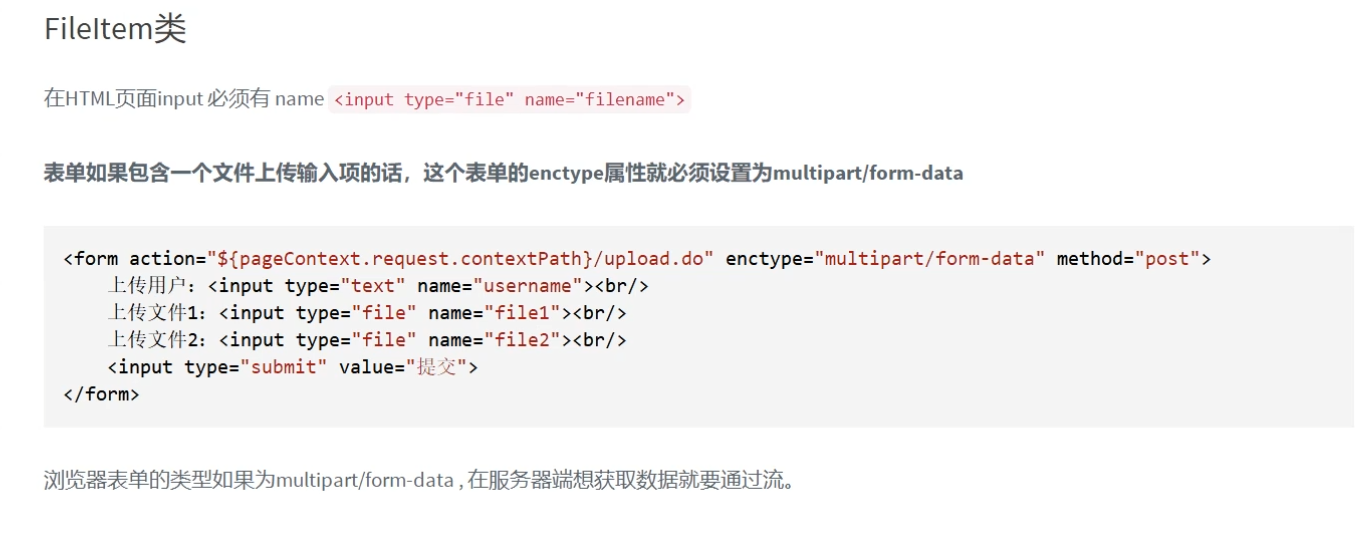
6.文件上传
之前在HttpServletResponse接口中介绍了文件的下载原理。
文件上传也就是文件下载的逆过程。
文件上传,客户端的浏览器将文件以流的形式提交到服务端。
一般采用apache的一个文件上传组件common-fileupload。
maven导包。
1
2
3
4
5
6
7
8
9
10
11
12
13
|
<dependency>
<groupId>commons-io</groupId>
<artifactId>commons-io</artifactId>
<version>2.6</version>
</dependency>
<dependency>
<groupId>commons-fileupload</groupId>
<artifactId>commons-fileupload</artifactId>
<version>1.4</version>
</dependency>
|

如何为上传的文件产生一个唯一的文件名?
时间戳,uuid,md5。

两种HTTP请求方式:
GET请求上传文件有大小限制,POST请求没有大小限制。

index.jsp内容:
1
2
3
4
5
6
7
8
9
10
11
12
| <html>
<head>
<title>Title</title>
</head>
<body>
<form action="${pageContext.request.contextPath}/upload.do" enctype="multipart/form-data" method="post">
<p>上传用户:<input type="text" name="user"></p>
<p><input type="file" name="file"></p>
<p><input type="submit" value="提交"> | <input type="reset" value="重置"></p>
</form>
</body>
</html>
|
1
2
3
4
5
6
7
8
9
10
11
12
13
14
15
16
17
18
19
20
21
22
23
24
25
26
27
28
29
30
31
32
33
34
35
36
37
38
39
40
41
42
43
44
45
46
47
48
49
50
51
52
53
54
55
56
57
58
59
60
61
62
63
64
65
66
67
68
69
70
71
72
73
74
75
76
77
78
79
80
| public class UploadServlet extends HttpServlet {
@Override
protected void doGet(HttpServletRequest req, HttpServletResponse resp) throws ServletException, IOException {
doPost(req, resp);
}
@Override
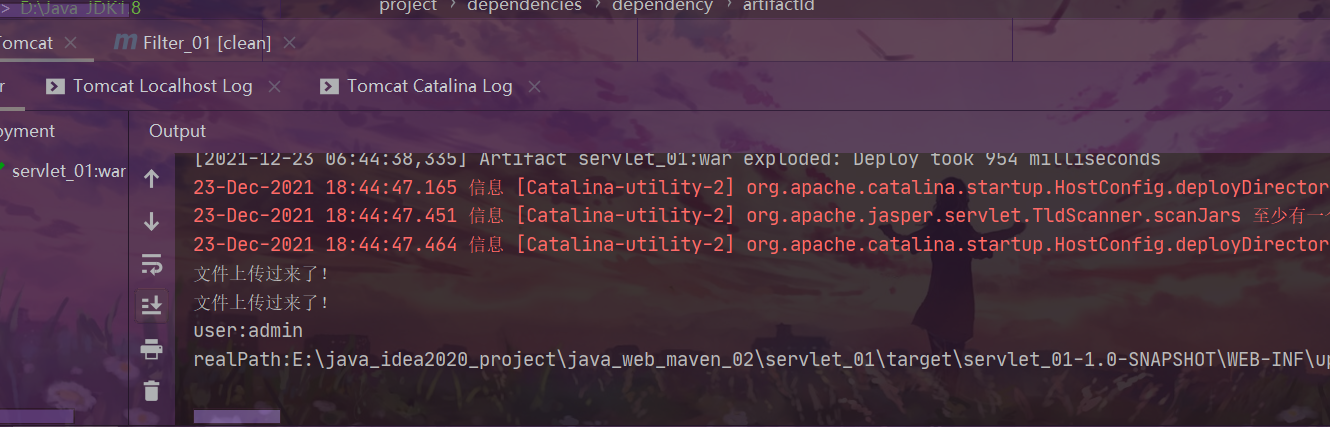
protected void doPost(HttpServletRequest req, HttpServletResponse resp) throws ServletException, IOException {
System.out.println("文件上传过来了!");
if (!ServletFileUpload.isMultipartContent(req)){
return;
}
String uploadPath = this.getServletContext().getRealPath("/WEB-INF/upload");
File uploadFile = new File(uploadPath);
if (!uploadFile.exists()){
uploadFile.mkdir();
}
String tmpPath = this.getServletContext().getRealPath("/WEB-INF/tmp");
File tmpFile = new File(tmpPath);
if (!tmpFile.exists()){
tmpFile.mkdir();
}
DiskFileItemFactory factory = new DiskFileItemFactory();
factory.setSizeThreshold(1024*1024);
factory.setRepository(tmpFile);
ServletFileUpload upload = new ServletFileUpload(factory);
try {
List<FileItem> fileItems = upload.parseRequest(req);
for (FileItem it: fileItems){
if (it.isFormField()){
String name = it.getFieldName();
String value = it.getString("utf-8");
System.out.println(name + ":" + value);
}else{
if (it.getName() == null || it.getName().trim().equals("")){
continue;
}
String uuidPath = UUID.randomUUID().toString();
String realPath = uploadPath + "/" + uuidPath;
System.out.println("realPath:" + realPath + ",filename:" + it.getName());
File realFile = new File(realPath);
if (!realFile.exists()){
realFile.mkdir();
}
InputStream is = it.getInputStream();
FileOutputStream fos = new FileOutputStream(realPath + "/" + it.getName());
byte[] buffer = new byte[1024*1024];
int len = 0;
while ((len = is.read(buffer)) > 0){
fos.write(buffer,0,len);
}
fos.close();
is.close();
}
}
} catch (FileUploadException e) {
e.printStackTrace();
}
}
}
|
测试成功!!!
太不容易了我。
BUG复盘:
直接进入upload.do发现tomcat报500错误,然后file->project settings->libraries删掉两个找不到类的jar包,然后maven重新导入,BUG解决!
7.总结
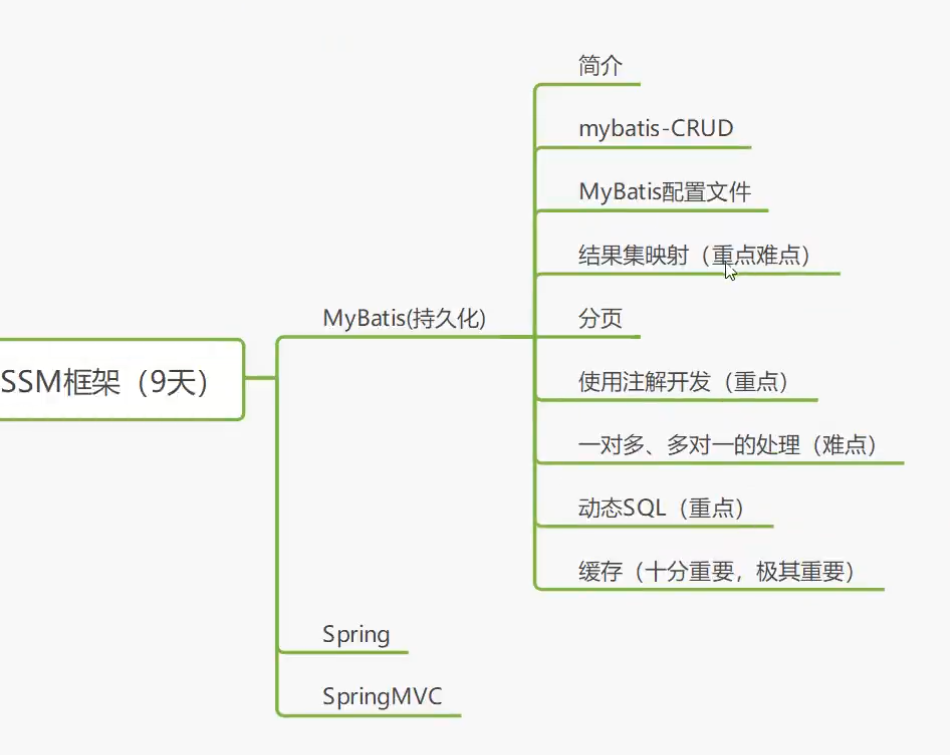
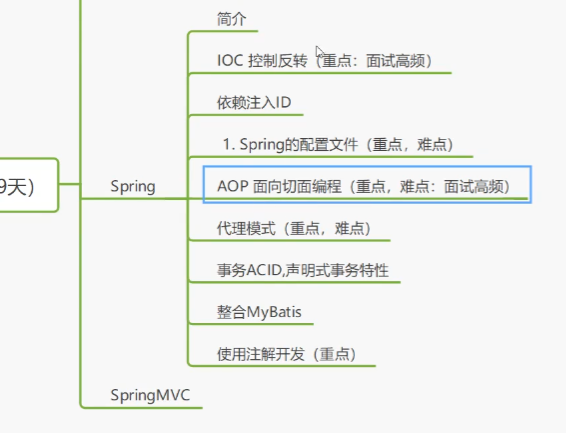
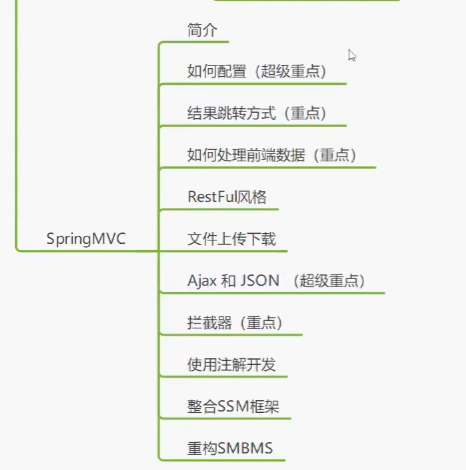
SSM框架的学习:
MyBatis:
Spring:
SpringMVC:
附上一份鱼皮的学习路线。