1.JDBC(重点)
Java操作数据库。
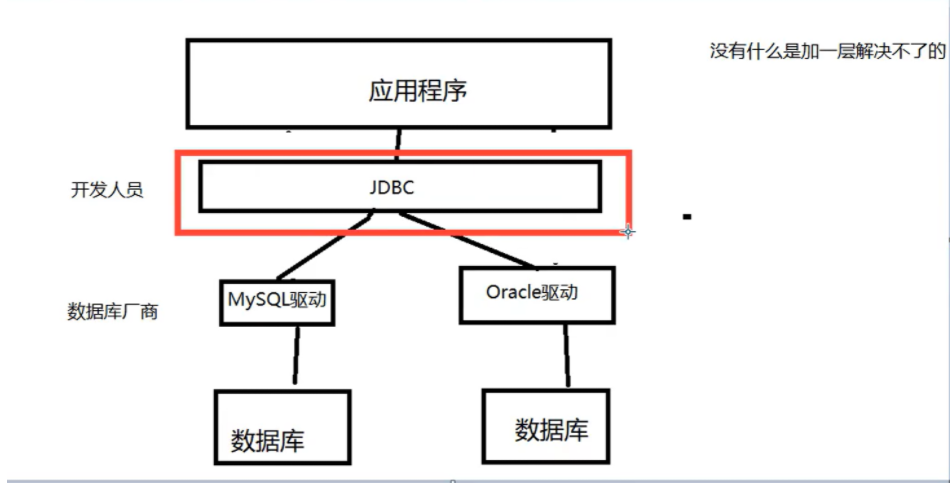
1.1 数据库驱动
驱动: 声卡,显卡,数据库等等都有驱动。
通过数据库驱动(中间桥梁),应用程序就可以和数据库打交道!
不同数据库厂商会提供相应的数据库驱动。
1.2 JDBC概述
规范,一个Java操作数据库的规范;
规范的具体实现,让具体的厂商去做;
对于开发人员来说,只要掌握JDBC接口的操作即可。
IDEA如何彻底删除一个project: https://blog.csdn.net/daponi/article/details/95328834。
IDEA如何在一个project(必须创建空项目)下创建同级module:
https://blog.csdn.net/qq_42764468/article/details/102496375。
JDBC入门教程(注意你的jar包版本): https://blog.csdn.net/weixin_44519467/article/details/103175338。
mysql驱动5.1.47: https://mvnrepository.com/artifact/mysql/mysql-connector-java/5.1.47。
要用到的东西:
两个类:java.sql和javax.sql;
还需要导入一个数据库驱动包。
1.3 第一个JDBC程序
2.SQL yog创建测试数据库。
关于SQLyog创建的数据库不显示的问题?
重新建立root用户连接。
3.编写测试代码。
1
2
3
4
5
6
7
8
9
10
11
12
13
14
15
16
17
18
19
20
21
22
23
24
25
26
27
28
29
30
31
32
33
34
35
36
37
38
39
40
41
42
43
44
45
46
47
48
49
50
| package com.jdbc.java.demo;
import java.sql.Connection;
import java.sql.DriverManager;
import java.sql.ResultSet;
import java.sql.Statement;
public class JDBCDemo1 {
public static void main(String[] args) throws Exception{
Class.forName("com.mysql.jdbc.Driver");
String url = "jdbc:mysql://localhost:3306/jdbcstudy?useUnicode=true&characterEncoding=utf8&useSSL=false";
String username = "root";
String password = "xxxxxxxx";
Connection connection = DriverManager.getConnection(url,username,password);
Statement statement = connection.createStatement();
String sql = "select * from users;";
ResultSet resultSet = statement.executeQuery(sql);
int num = 1;
while (resultSet.next()){
System.out.println("line" + num + ":\t");
System.out.println("id=" + resultSet.getObject("id"));
System.out.println("NAME=" + resultSet.getObject("NAME"));
System.out.println("PASSWORD=" + resultSet.getObject("PASSWORD"));
System.out.println("email=" + resultSet.getObject("email"));
System.out.println("birthday=" + resultSet.getObject("birthday"));
num ++;
System.out.println("------------------------");
}
resultSet.close();
statement.close();
connection.close();
}
}
|
1
2
3
4
5
6
7
8
9
10
11
12
13
14
15
16
17
18
19
20
21
22
23
24
25
26
27
28
29
30
31
32
33
34
35
36
37
|
Class.forName("com.mysql.jdbc.Driver");
-------------------
String url = "jdbc:mysql://localhost:3306/jdbcstudy?useUnicode=true&characterEncoding=utf8&useSSL=false";
-------------------
Connection connection = DriverManager.getConnection(url,username,password);
connection.rollback();
connection.commit();
connection.setAutoCommit();
-------------------
statement.executeQuery();
statement.execute();
statement.executeUpdate();
-------------------
resultSet.getObject();
resultSet.getString();
resultSet.getInt();
resultSet.getFloat();
resultSet.getDouble();
resultSet.next();
resultSet.beforeFirst();
resultSet.afterLast();
resultSet.previous();
resultSet.absolute(i);
|
1.4 工具类
根据JDBC程序,整体框架是不变的,主要是sql语句的变动。
所以可以封装一个工具类来简化操作。
在src目录下新建db.properties文件,将驱动操作解耦合。
Properties 继承于 Hashtable。表示一个持久的属性集,属性列表中每个键及其对应值都是一个字符串。
加载Properties配置文件的两种方式在Java入门笔记(二十)讲解过。
1
2
3
4
5
6
7
8
9
10
11
12
13
14
15
16
17
18
19
20
21
22
23
24
25
26
27
28
29
30
31
32
33
34
35
36
37
38
39
40
41
42
43
44
45
46
47
48
49
50
51
52
53
54
55
56
57
58
59
60
61
62
63
64
65
66
67
68
69
70
71
72
73
|
driver=com.mysql.jdbc.Driver
url=jdbc:mysql:
username=root
password=xxx
package com.jdbc.java.demo.utils;
import java.io.InputStream;
import java.sql.*;
import java.util.Properties;
public class Jdbcutil {
private static String driver = null;
private static String url = null;
private static String username = null;
private static String password = null;
static{
InputStream in = null;
try{
in = Jdbcutil.class.getClassLoader().getResourceAsStream("db.properties");
Properties properties = new Properties();
properties.load(in);
driver = properties.getProperty("driver");
url = properties.getProperty("url");
username = properties.getProperty("username");
password = properties.getProperty("password");
Class.forName(driver);
}catch(Exception e){
e.printStackTrace();
}finally {
if (in != null) {
try {
in.close();
} catch (Exception e) {
e.printStackTrace();
}
}
}
}
public static Connection getConnection() throws SQLException {
return DriverManager.getConnection(url, username, password);
}
public static void release(Connection con, Statement st, ResultSet rs) throws SQLException {
if (rs != null){
try{
rs.close();
}catch(Exception e){
e.printStackTrace();
}
}
if (st != null){
try{
st.close();
}catch(Exception e){
e.printStackTrace();
}
}
if (con != null){
try{
con.close();
}catch(Exception e){
e.printStackTrace();
}
}
}
}
|
插入操作测试类:
1
2
3
4
5
6
7
8
9
10
11
12
13
14
15
16
17
18
19
20
21
22
23
24
25
26
27
28
29
30
| package com.jdbc.java.demo;
import com.jdbc.java.demo.utils.Jdbcutil;
import java.sql.Connection;
import java.sql.ResultSet;
import java.sql.Statement;
public class JDBCDemo2 {
public static void main(String[] args){
Connection con = null;
Statement st = null;
ResultSet rs = null;
try{
con = Jdbcutil.getConnection();
st = con.createStatement();
String sql = "insert into users(`id`,`NAME`,`PASSWORD`,`email`,`birthday`)" +
"values ('4','Tom','123345','2325524@163.com','1993-09-21');";
int i = st.executeUpdate(sql);
if (i > 0) System.out.println("插入数据成功!");
}catch(Exception e){
e.printStackTrace();
}finally {
try {
Jdbcutil.release(con, st, rs);
}catch(Exception e){
e.printStackTrace();
}
}
}
}
|
以后执行SQL操作只需要将SQL的内容换掉就行,如:
1
| DELETE FROM users WHERE id = 4;
|
增删改都用:executeUpdate方法,查使用:executeQuery方法。
1.5 预编译SQL示例
1
2
3
4
5
6
7
8
9
10
11
12
13
14
15
16
17
18
19
20
21
22
23
24
25
26
27
28
29
30
31
32
33
34
35
36
37
| public class TestJDBC2 {
public static void main(String[] args) throws Exception {
String url="jdbc:mysql://localhost:3306/jdbc?useUnicode=true&characterEncoding=utf-8";
String username = "root";
String password = "123456";
Class.forName("com.mysql.jdbc.Driver");
Connection connection = DriverManager.getConnection(url, username, password);
String sql = "insert into users(id, name, password, email, birthday) values (?,?,?,?,?);";
PreparedStatement preparedStatement = connection.prepareStatement(sql);
preparedStatement.setInt(1,2);
preparedStatement.setString(2,"狂神说Java");
preparedStatement.setString(3,"123456");
preparedStatement.setString(4,"24736743@qq.com");
preparedStatement.setDate(5,new Date(new java.util.Date().getTime()));
int i = preparedStatement.executeUpdate();
if (i>0){
System.out.println("插入成功!");
}
preparedStatement.close();
connection.close();
}
}
|